Started a blog on Blogger but not getting the option to add a contact form? That’s really a thing that needs your attention because the Contact us page is one of the most important pages in a blog or website.
Whether you are going to apply for Google AdSense or applying for any payment gateway, they will first look at whether you have a proper contact us page added on your website or not!
Also, it is important for your users as well, they can easily contact you for sharing their queries and feedback about your website or topics you write about.
So, the Contact us page is crucial for a blog/website.
And adding one to the blogger platform is not that easy as it is in WordPress because, in WordPress, there are plenty of plugins available which can make this task a piece of cake for you. But how to do it in blogger? Because you don’t have the power of plugins there.
WAIT, don’t worry! I know there is no plugin to create a contact form in blogger but still, I will show you some easiest methods you can follow to add a contact page in your blogger blog.
So, let’s proceed and add it now…
Table of Contents
How To Add A Contact Form In Blogger?
I am going to list down the 2 easiest methods I’ve tested that you can use to add a contact form in blogger.
Method #1. 123 Form Builder
This is my favourite option for adding a contact form in blogger. 123 Form Builder makes building forms easy for non-WordPress websites like Blogger.
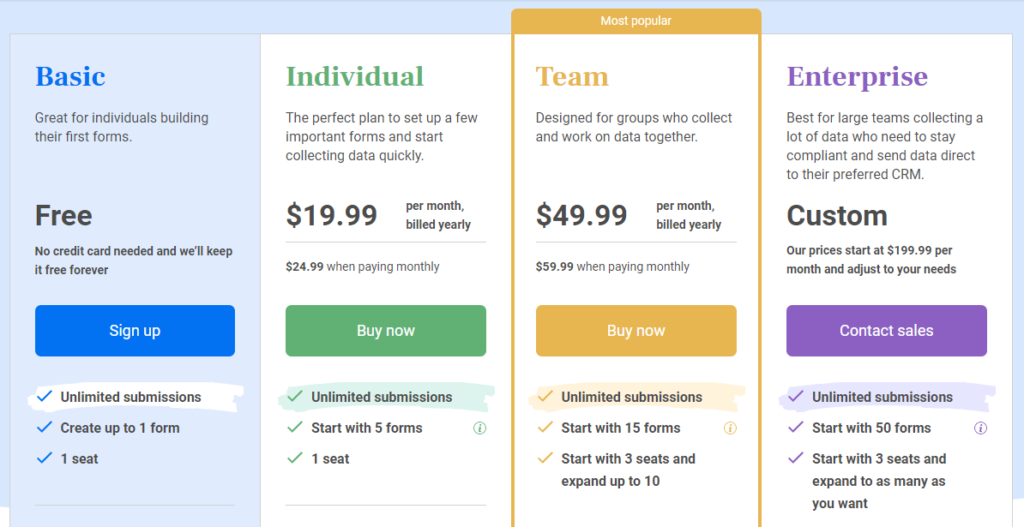
123 Form Builder has both free and premium plans that you can use, if you need a contact form for just one blogger blog then its free plan is perfect for you. Because it allows you to create up to 1 form and receive unlimited submissions and that’s all you need if you have one blogger blog.
Have a look at the 123 Form Builder pricing:
Now let me show you how you can add a contact form in blogger using 123 Form Builder.
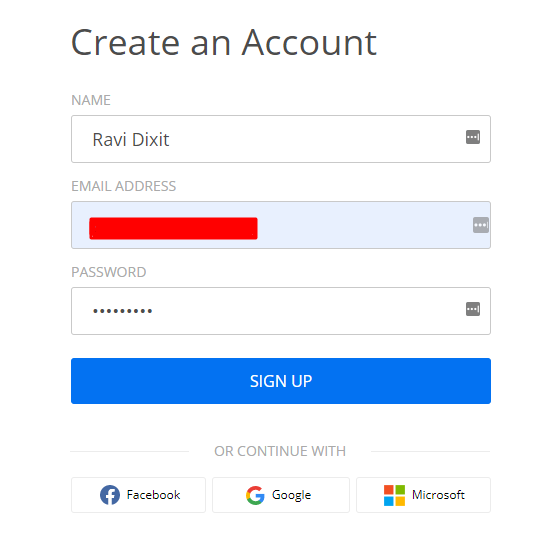
Step: 1 Signup for 123 Form Builder free plan. But if you need more than 1 form for your blogger blog, consider going with the premium plan.
Enter your details like Name, Email Address, and Password to create an account with the 123 Form Builder. Either you can use your Google, Facebook or Microsoft account to signup with ease.
Step: 2 Choose the Contact Form template from the template gallery, it will make your work easy as it comes with default fields already added. You just need to customize fields to match your requirement.
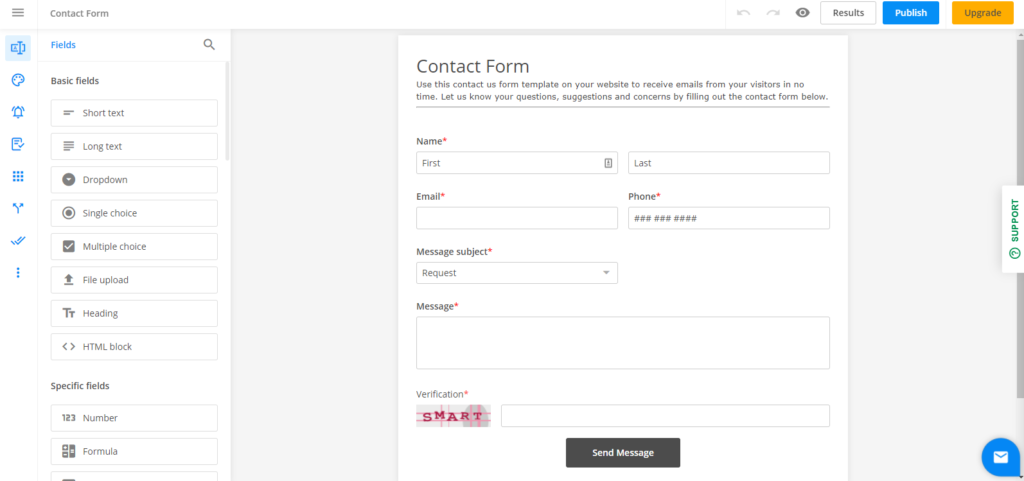
Step: 3 Just after selecting the template, you will see the 123 Form Builder interface, just click on any field you want to customize. You will get the customization option on the left side, you can change the label, is that field require? instruction, and many other things.
Also, you can add the new fields if you want, dragging from the left side to the form where you want to add the field.
Step: 4 Once you are done with form editing and your form is ready to publish. Hit the Publish button on the right top corner and navigate to Platforms>Blogger.
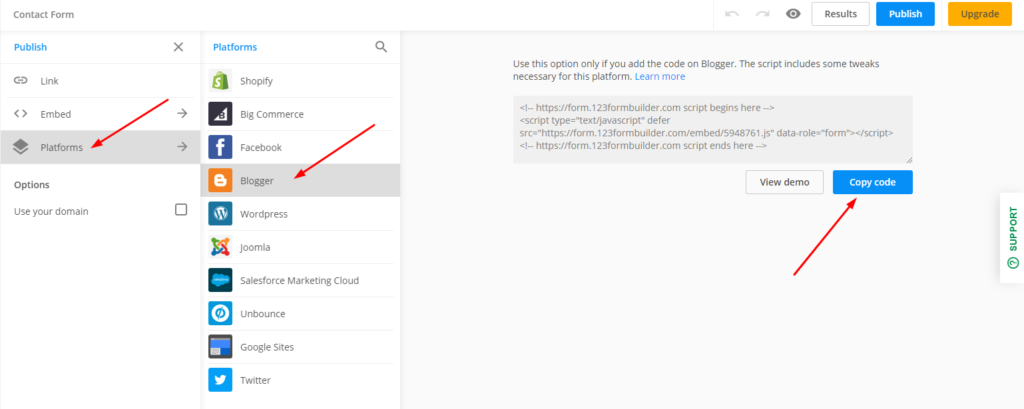
You will be seeing a code that you need to paste on your contact us page in HTML mode. If you don’t have a contact page already created, create one by going to Pages>Add New.

Paste the code you copied from the 123 Form Builder. Once everything is set up, hit the Publish button.
That’s how you can add a contact form in Blogger using the 123 Form Builder.
Method #2. Contact Form Using Blogger’s Contact Us Gadget
Blogger has the option to add the contact us form but not on the pages, this gadget can only add the form with the sidebars. So, you can easily add the contact form on your blogger blog’s sidebar.
But we need to add to the contact page. That’s what we are looking for… Well, let me help you with this and show you how you can add a contact form on a page using the Contact Us gadget available in Blogger.
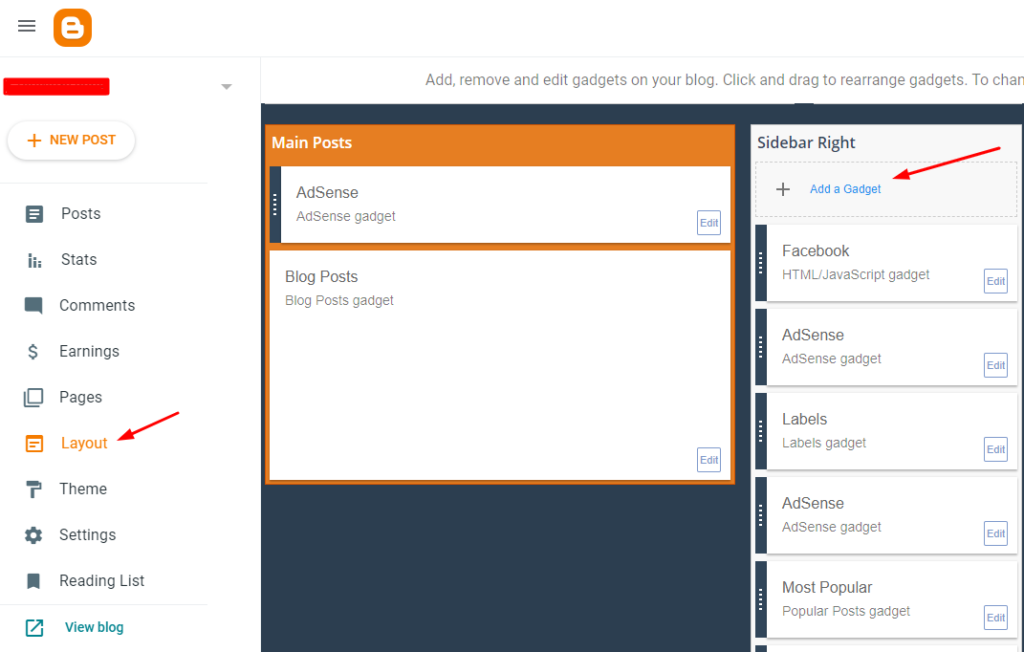
Go to Layouts from your blogger dashboard and click on + Add a gadget on the sidebar.
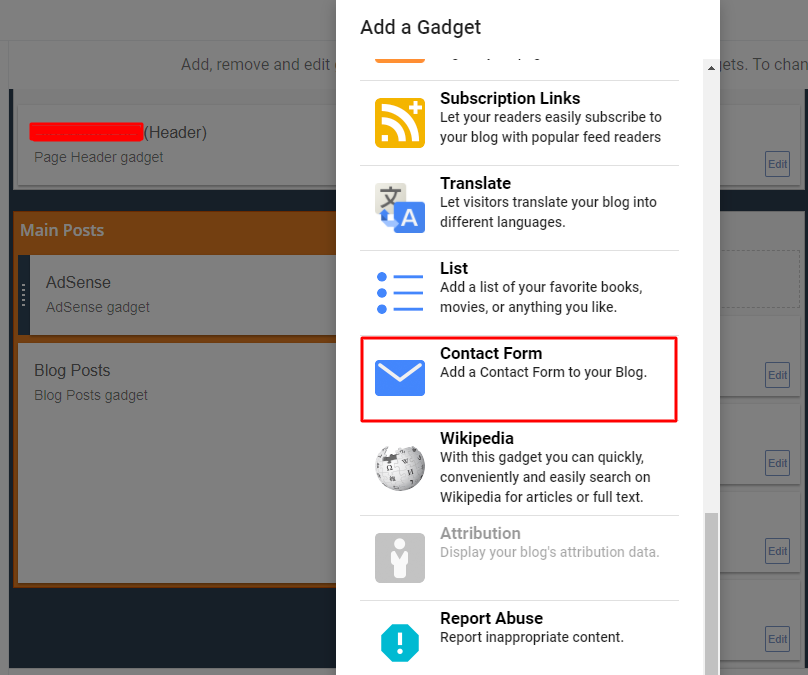
Then search for the Contact Form gadget, add it to the sidebar.
Now the contact form is added, but in the sidebar, not on the page where we want to add it. So, now you have to hide it from the sidebar. Follow the below instructions to high the form from the sidebar.
- Go to Theme from your blogger dashboard, then click on the down arrow beside the customise and click on Edit HTML.
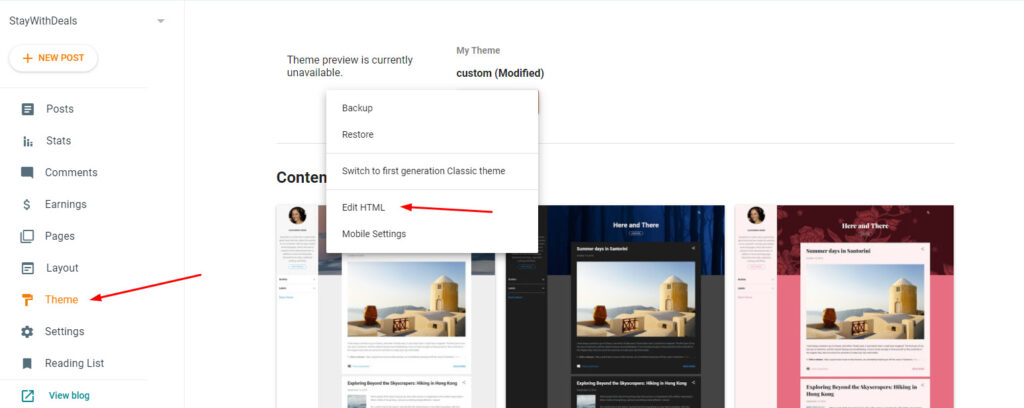
- Now search for the ]]></b:skin> and place the below code just before it.
div#ContactForm1 {
display: none !important;
}
After adding the code, hit the save button to make the changes live on your blogger site. Now the contact form is hidden from your blog’s sidebar.
Now let’s add the contact form on a page (contact page).
First, create a contact page by going to Pages>New page, name it Contact or Contact us and choose the HTML view.

Paste the following code on the page in HTML view.
<div id="custom_ContactUsFromForBlogSpotBlogger" class="widget ContactForm">
<div class="contact-form-widget">
<p>Please fill in the form below to get in touch with us.</p>
<div class="form">
<form name="contact-form">
<p></p>
Your Name
<br>
<input type="text" value="" size="30" name="name" id="ContactForm1_contact-form-name" class="contact-form-name">
<p></p>
Your Email
<span style="font-weight: bolder;">*</span>
<br>
<input type="text" value="" size="30" name="email" id="ContactForm1_contact-form-email" class="contact-form-email">
<p></p>
Your Message
<span style="font-weight: bolder;">*</span>
<br>
<textarea rows="5" name="email-message" id="ContactForm1_contact-form-email-message" cols="25" class="contact-form-email-message"></textarea>
<p></p>
<input type="button" value="Send" id="ContactForm1_contact-form-submit" class="contact-form-button contact-form-button-submit">
<p></p>
<div style="text-align: center; max-width: 222px; width: 100%">
<p id="ContactForm1_contact-form-error-message" class="contact-form-error-message"></p>
<p id="ContactForm1_contact-form-success-message" class="contact-form-success-message"></p>
</div>
</form>
</div>
</div>
<div class="clear"></div>
<span class="widget-item-control">
<span class="item-control blog-admin">
<a title="Edit" target="configContactForm1" onclick="return _WidgetManager._PopupConfig(document.getElementById("ContactForm1"));" href="//www.blogger.com/rearrange?blogID=988047564858147459&widgetType=ContactForm&widgetId=ContactForm1&action=editWidget§ionId=sidebar-right-1" class="quickedit">
<img width="18" height="18" src="//img1.blogblog.com/img/icon18_wrench_allbkg.png" alt="">
</a>
</span>
</span>
<div class="clear"></div>
</div>Note: Make sure to change the blogID with your blog ID which you can easily find from the URL of your blogger dashboard. Go to your Blogger dashboard and see your URL, copy the 18 digit blog ID from there and replace the blogID in the code.
Now publish the page to make it live on your blog, congrats you have successfully added the contact form in your blogger blog.
Conclusion
That’s it! This is how you can add a contact form in your Blogger blog, it is not that much tough as it seems because of not having plugins to create forms in blogger as we have in WordPress. You just need to follow the methods I have shared above.
Here are some other articles related to Blogger that you might want to read:
- Blogger Vs WordPress: Which Is Best For You To Start A Blog? (Quick Comparison)
- How To Change Blogger Email Address? A Step By Step Process
I hope you found this post helpful if you did then make sure to share it with others!


